
Airfix DogFighter Programmer's Manual
| Home | Introduction | UPX-extractor | Game Structure | Tutorial | File Types |
<< Page 1 Tutorial Page 3 >>
2. General Principles.
Before we get bogged down in technical details, here is how the whole
thing works:
In order to create a new map/level/scenario/mission or whatever you would like to call it, you need to
create a .level-file. Theoretically you could create one from scratch in a Hex Editor, but that would be rather
silly, as we have the perfect tool at our disposal: the House Editor. Think of the .level-file as a scratchpad, or notice board,
where the House Editor stores the info about the part of the house you have chosen for the level, and about any object that you
place on the map. The info about the part of the house itself is stored in a .world-file, all objects and models are
described in their own .object-files. These in their turn refer to other files for their textures etc., but for the
moment I don’t want to dig down too deeply. As some objects are, or can be, more interactive than others, they are contained in
different classes. If you have a look at the Objects folder you will find that there are several subfolders:
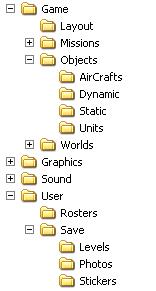 |
The Static-folder contains the least interactive objects: chairs, beds, tables, paintings etc.
They can not be destroyed, can’t move, they are just part of the environment. |
Unlike the binary .level-file, the .asf-file is a scriptfile. As we will see later, it only contains a reference
to the .level-file for the description of the map-world and the static- and dynamic objects, but explicitly lists
the identity and properties of each interactive Object, i.e. Units and Aircrafts.
When you start a Server to play the level, it is this .asf-file that is loaded and used by the game engine.
As we will see later in detail, you can’t set the properties of Units and Models in the House-Editor (unless you use
the "Extra"-cheat), but you can adjust them in the .asf-file using a simple text-editor like Notepad. The only
nuisance with this is that, when you update the map in the House Editor at a later date, the .asf-file will automatically
be regenerated on saving, overwriting all the tweaking you might have done in the previous version. Saving the .asf
before editing the map and restoring it afterwards will be no good, as the changes you have made in the .level-file
might not be picked up. To avoid having to re-tweak your .asf-file everytime you alter the scene a bit, it is better to
set the properties that you can in the .level-file. We can’t do that in the ADF House Editor, but we can with a Hex Editor.
As mentioned earlier, there is another way to avoid this problem, but for now let’s concentrate on tweaking the .level file……
3. A Scenario Example.
As mentioned, when you create a new map in the House Editor and save it, this map will be written to the User-Folder. Both the .level-file and the .afs-file will be saved there under the name you gave the map in the House Editor. This map is intended for multiplayer dogfights, but with a little tweaking can also be used for a home-made Campaign Mission. How? We will find out later, but for now let’s take a closer look at these files by means of an example…..
Example 1.
Let’s go into the House Editor, select “New House” and select “Living,Dining, Kitchen” .This will open up a world with all
three rooms acessible, and will define the .world-file reference in the .level file.
In chapter 3 we discussed that there are four types of objects, so let’s place one of each on the map:
Earlier we mentioned that aircraft are objects contained in a separate folder “Aircrafts”.
We will see that they they are considered as Units as well, though. They are only stored in a separate folder because
we can actually fly them. Notice that the B17 and the Avro Lancaster are not in the Aircrafts-folder but in the Units folder…
But, let’s include one anyway:
We aren’t done yet, as we haven’t specified a Player Start Position, or PSP for short. So, from the “Special” tab under
“Select Toy”,Select a Player Start Position. You will see a spinning Yellow Arrow. Press “Select” and position the
PSP underneath the Dining Table. Try not to rotate it…...
The result should look more or less like this:
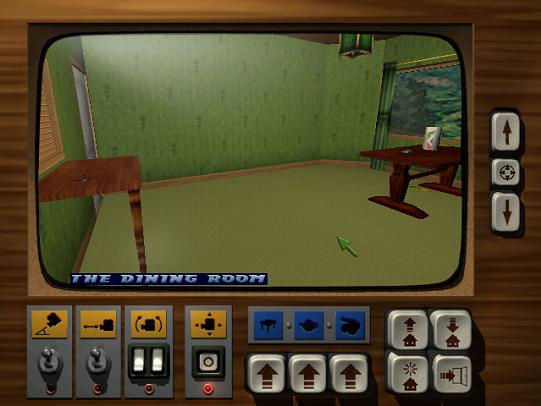
Save the map as sample1, exit the House Editor and start the level with “Multiplayer: Select the “Start Server” tab,
select sample1 in the list of available levels and click the “Start Server” button. Depending on what plane you select,
the moment you start you will get the message: “XXX has joined the YYY forces”, in which XXX is the name of the pilot
you are logged in as, and YYY stands for either Axis or Allied, depending on what aircraft you have selected.
Note: This will only work if you have followed the tips in the article “teamplay.doc”,
available on the website. Make sure the user.ini-file in the “Airfix Dogfighter” –folder contains
the line: “sets dogfight_teamplay “true”. If you get the message “XXX has joined the game”
then this has not been set up successfully….
At this point it will not make any difference anyway, because no matter what plane you have selected, the moment
you spawn both the Fw190 and the tank will try to blow your brains
out.... Why?
ADF recognises 3 sides: Allied, Axis and Neutral. When you place Units on the map, the House Editor sets the team for each unit
placed to Neutral by default. Setting a Team for an object is done by setting a numerical value to:
You would think 2 would have a meaning as well, perhaps Third Party, but I haven’t had time to find out as yet.
Anyway, a setting of 0 is not really neutral, because objects with such a setting are fair game for everyone and
WILL get attacked… So how do we change this setting?
3.1: the .afs-file.
Open the file sample1.afs that you will find in the User/Save/Levels folder, in Windows Notepad. So, Let’s have a look at the file first, before we do anything drastic……
It will look like this:
sample1.afs
//===================================================
//
// This file was generated by Airfix Dogfighter.
// Do NOT modify!!
//
//===================================================
object LevelData
{
int m_uidModel2;
int m_uidModel1;
int m_uidModel0;
event SetupLevelData
{
LoadUserLevel( "sample1" );
// Start position
AddStartPos( "dining_room",
coord3d(55.402313, 0.077004, 3.736731), coord3d(0.000000, 0.030000, 0.000000) );
// Actor Model1
m_uidModel1 = CreateActor( "AcFw190",
"Model1", "dining_room", coord3d(37.805706, 3.987200,
3.058321), coord3d(0.000000, PI+-0.031585,
0.000000) );
SetPickupType( m_uidModel1, "" );
SetSquad( m_uidModel1, 0 );
SetTeam( m_uidModel1, 0 );
SetRank( m_uidModel1, 0 );
AIActivate( m_uidModel1 );
AISetStayRoom( m_uidModel1, 1 );
AISetAggression( m_uidModel1, 50 );
AISetPickupPrio( m_uidModel1, 50 );
AISetAttackPrio( m_uidModel1, 50 );
// Actor Model0
m_uidModel0 = CreateActor( "GuChurchill",
"Model0", "dining_room", coord3d(54.044472, 3.252750,
3.483997), coord3d(0.000000, PI+1.570796, 0.000000) );
SetPickupType( m_uidModel0, "" );
SetSquad( m_uidModel0, 0 );
SetTeam( m_uidModel0, 0 );
SetRank( m_uidModel0, 0 );
AIActivate( m_uidModel0 );
AISetStayRoom( m_uidModel0, 1 );
AISetAggression( m_uidModel0, 50 );
AISetPickupPrio( m_uidModel0, 50 );
AISetAttackPrio( m_uidModel0, 50 );
//
// Interactive objects
//
DoorSetOpen(
GetActorByName("door_diningroom_livingroom") );
}
}
The first thing we see is a warning that this file is automatically generated and should NOT be modified.
Normally a wise advice, but in this case that is exactly what we are going to do a bit later on……
The next three lines declare variables in advance. In C++, this always has to be done.
After that, it will set the properties for the Actors: In Object Oriented Programmers Speak that means the Objects that have Methods as well as Properties. In plain
language: those objects that can move and / or shoot.. In other words, the objects that are descibed in the “Units”-folder we discussed earlier.
Let's have a closer look at one of the blocks:
// Actor Model0
m_uidModel0 = CreateActor( "GuChurchill",
"Model0", "dining_room", coord3d(54.044472, 3.252750,
3.483997), coord3d(0.000000, PI+1.570796, 0.000000) );
SetPickupType( m_uidModel0, "" );
SetSquad( m_uidModel0, 0 );
SetTeam( m_uidModel0, 0 );
SetRank( m_uidModel0, 0 );
AIActivate( m_uidModel0 );
AISetStayRoom( m_uidModel0, 1 );
AISetAggression( m_uidModel0, 50 );
AISetPickupPrio( m_uidModel0, 50 );
AISetAttackPrio( m_uidModel0, 50 );
This block describes settings for Model0. Between the brackets we see 5 parameters.
- “GuChurchill” refers to the object of the same name in the “Units”-folder.
- “Model0” is the Object Label. This is the name you see when you place your arrow over an object in the House Editor.
- “dining room” refers to the location of the object.
- Coord3d: this occurs twice, with different values for the three parameters within its brackets.